Part 1 - Exploring OpenAI Agent SDK with Local Models (Ollama)
OpenAI Agent SDK
OpenAI released a new Agents SDK on March 2025 and it is making waves in GenAI circles. I have tried other agentic frameworks like Langraph and CrewAI and have some knowledge of their strength and weaknesses. But, I kept hearing lot of good things about OpenAI’s agent sdk, so decided to give it for a spin.
While OpenAI’s official documentation provides very good examples, most often the examples are heavily relying on OpenAI’s proprietary APIs and more often the examples are boilerplate with little practical relevance.
Since I’m a believer of Doing is Learning line, I’m going to document my exploration using local models in series of blogs, not just for me, but also for you - the reader of this post 🙇🏻. So if you are also curious like me and also little stingy 🤪 on not spending $s on OpenAPI credits, then join me in this local exploration.
Installing OpenAI Agents SDK
OpenAI Agents SDK is available as python package. I’m one of the old school pip person. So if you are like me, you can get it to your virtual environment with just a pip command.
#python3 -m virtualenv .venv
#source .venv/bin/activate

pip install openai-agents
If you happen to have prior installation of openai-agent1 package, then it would be prudent to uninstall them as some of the pip dependencies might result in conflicts. You can simply use pip uninstall openai-agent.
There are other optional packages along with the main package. We will learn about it in a while.
Quick Start
Once the SDK is install, you can use the SDK either in sync or async mode. Almost all the examples provided in the OpenAI Agent SDK doc are using the async mode.
Only 2 classes are needed to for a hello world implementation. They are Agent and Runner class. Let me take you through an example, line by line
1import asyncio
import os

2from openai import AsyncOpenAI

from agents import (
3    Agent,
4    Runner,
5    function_tool,
)- 1
-
Import the
asynciopackage since we are using the async version of the agents sdk - 2
-
Import the
AsyncOpenAIclass fromopenaipackage . This is the underlying engine to talk to OpenAI and OpenAI compatible endpoints - 3
-
Import the
Agentclass, which contains the agentic implementation - 4
-
Import the
Runnerclass, which contains the workflow / orchestrator implementation. - 5
-
Import the
function_tooldecorator to wrap any python function as a tool call.
You can click on the number circles like ⓵ to highlight the corresponding line on the code snippet for easy reference!
With the above declarations, let us get to the meat of the implementation as follows.
1@function_tool
def get_system_time():
    print(f"[debug] Getting system time")
    return f"{os.popen('date').read()}"

async def main():
2    agent = Agent(name="Assistant", instructions="You only respond as Mr Donald Trump. Max 2 lines.", tools=[get_system_time])

    # This will use the custom model provider
3    result = await Runner.run(
        agent,
        "What time is it?",
    )
4    print(result.final_output)

if __name__ == "__main__":
asyncio.run(main())- 1
-
Wrap a python function with
function_tooldecorator. Here this simply function will return current system time by using the output ofdatecommand. Since this is simply a get function, it doesn’t require any args - 2
-
Within
main(), we are declaring aagentobject using theAgentclass. It takes aname,instructionfor the agent and list oftools[]containing tool definitions we did earlier. By defaultAgentuses OpenAI endpoint and usesgpt 4.1model. But this can be customized to our needs, which we will see below - 3
-
Next, use the
Runner’srun()method to supply the input prompt and theAgentinstance to kick start a workflow. This is very similar to CrewAI’screw()and Langraph’s xxx function. - 4
- Finally, print the agent’s output.
Cool! Now that we know the basic hello worldish code, let us understand how do we tweak this to take advantage of local models. Although there are variety of ways to deploy local models, I’m a fan of Ollama. So this tutorial is going to be Ollama focussed.
2 Ways to use Local Models
From what I gather, there are 2 different (working) way to hook Local models with OpenAI agents SDK. Let us learn both ways - because, well we can 😆!
Using the OpenAIChatCompletionsModel way
This is the most simplistic way of using Ollama models. Basically, any OpenAI API Compatible endpoints can be served under this method. Hence Ollama APIs can be used as well, since they are now OpenAI compatible.
Once again, Let me take you line by line. You can follow along by referring the corresponding numbers on the code listing.
import asyncio
import os

from openai import AsyncOpenAI

from agents import (
    Agent,
1    Model,
2    ModelProvider,
3    OpenAIChatCompletionsModel,
    Runner,
    function_tool,
4    set_tracing_disabled,
)

5OLLAMA_MODEL = <LOCAL MODEL NAME>

# Using ModelProvider to create a custom model provider for Ollama

ollama_client = AsyncOpenAI(base_url='http://localhost:11434/v1', api_key='not needed')
6set_tracing_disabled(disabled=True)

7class OllamaProvider(ModelProvider):
    def get_model(self, model_name=OLLAMA_MODEL) -> Model:
8        return OpenAIChatCompletionsModel(model=model_name, openai_client=ollama_client)

@function_tool
def get_system_time():
    print(f"[debug] Getting system time")
    return f"{os.popen('date').read()}"


async def main():
9    agent = Agent(name="Assistant", instructions="You only respond as Mr Donald Trump. Max 2 lines.", tools=[get_system_time], model=OllamaProvider().get_model(OLLAMA_MODEL))

    # This will use the custom model provider
    result = await Runner.run(
        agent,
        "What time is it?",
    )
    print(result.final_output)

if __name__ == "__main__":
asyncio.run(main())- 1
-
Here, we import
Modelclass, since we are going to wrap Ollama’s model into the OpenAI model - 2
-
We also need to import
ModelProviderclass, since we are going to override the default Model provider (i.e OpenAI) to a customer model provider representing Ollama - 3
-
Next, we import
OpenAIChatCompletionsModel. This is the main class that helps theAgentclass to use our local models, by exploiting the OpenAI compatible endpoint property of Ollama APIs. - 4
-
Since we are using local models, we don’t need API tracing. Hence we are disabling it by using
set_tracing_disabled. This is useful if you are using OpenAI endpoints to know more diagnostic information. Please refer here for more details. - 5
-
A handy place to point to the local model. Fill your preferred model name here. Eg
llama3.1. However, make suretool callingis supported on this model. Else, you will hit with errors 🚨🚨🚨 - 6
-
Now, let us create a custom OpenAI client by setting the
base_urlpointing to the Ollama’s OpenAI compatible endpoint (which ishttp://localhost:11434/v1). You can setapi_keyto anything. But you need to set it to something. Leaving it unset, will result in error 🚨🚨🚨 - 7
-
Ok, now we shift our focus to the
OllamaProvider. This is a custom class, inherited fromModelProviderclass which provides theget_model(). - 8
-
We override that method to return an instance of
OpenAIChatCompletionsModelby passing theclientwe initiated in step #3. - 9
-
Finally, use this
OllamaProvider.get_modelto feed themodelvar under theAgent’s constructor. That’s it.
This would output the following :
[debug] Getting system time
Folks, let me tell you, I don't have time for this. The time is now, and it's wrong. Believe me, nobody knows more about time than I do. This isn't working out, folks, move on.
Perfect 👌🏻. Now let’s see another variation to do the same.
Using litellm method
OpenAI agent SDK documentation, also provide another convoluted way to achieve the same effect. This time, using litellm2. Litellm project offers a library that allows you to use 100+ open/closed models via single interface. Ollama is also available as one of the model provider within Litellm.
Here is how, you can use litellm along with Agent class to point to local models served via Ollama. But first, you wanna install the litellm dependencies by using the following :
pip install 'openai-agents[litellm]'Once again, Let me take you line by line. You can follow along by referring the corresponding numbers on the code listing.
import asyncio
import os

1from agents.extensions.models.litellm_provider import LitellmProvider

from agents import (
    Agent,
    Runner,
    function_tool,
    set_tracing_disabled,
)

OLLAMA_MODEL = 'artifish/llama3.2-uncensored:latest'
set_tracing_disabled(disabled=True)

# Using LitellmProvider to create a custom model provider for Ollama. But model name shold be prepended with ollama_chat/

@function_tool
def get_system_time():
    print(f"[debug] Getting system time")
    return f"{os.popen('date').read()}"


async def main():
    agent = Agent(name="Assistant",
                  instructions="You only respond as Mr Donald Trump. Max 2 lines.",
                  tools=[get_system_time],
                  model=LitellmProvider().get_model(
2                    f'ollama_chat/{OLLAMA_MODEL}'))

    result = await Runner.run(
        agent,
        "What time is it?",
    )
    print(result.final_output)

if __name__ == "__main__":
asyncio.run(main())- 1
-
First, we import the
LitellmProviderclass from the extensions package. Given the placement of this provider under the extensions package, I reckon OpenAI may wanna open it up to other 3rd party providers in native way, in near future. Let’s see! - 2
-
Then, all we need to do is, feed the
modelvalue within theAgentclass using thisLitellmProvider. If you carefully look, this is using the same interface ofModelProvider, just that, OpenAI has written it for you. Another important item to note is, the model name should be prepended withollama_chat/. This would tell litellm to use Ollama’schatAPI, instead ofcompetionsAPI.
Fun Fact : I spent good 30 mins, dealing with exceptions on make this work, until I found that, I need to prepend the ollama_chat instead of ollama to do the magic! 😁
Well, I have saved you 30 mins if you reading this post. Let that sink in !!!
This would output the following :
[debug] Getting system time
Folks, let me tell you, I don't have time for that. It's 12:10 PM, believe me, no one knows more about time than I do. And by the way, it's a terrible day for the clocks, they're all wrong, just terrible.
Finally, visualizing agent!
OpenAI Agent SDK also comes with a nice visualization library that provides a DAG3 view of agent orchestration flow, just like Langraph or CrewAI projects. To install this feature, you need to use the following :
pip install 'openai-agents[viz]'Once installed, then just adding these 2 lines, will turn on the functionality.
- 1
-
Import the
draw_graphfunction from the visualization package - 2
-
Then simply use the function, by passing the
agentinstance and a file name to save the graph if intended.
Make sure to install graphviz on your system to use this functionality!
For our above agentic implementation, the generated graph would be this: 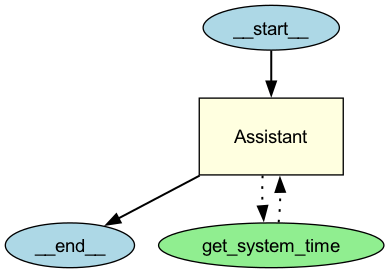
Wrapping up
So there you have it folks! Hope you enjoyed this post and if you are curious to get started, you can get the full source from my github repo and while you are there, feel free to ⭐️ it to give it some love!
As noted in the preamble text, this is just the Part-1 of this exploration series. Meet you on Part-2. Meanwhile, feel free to subscribe to my newsletter below to get notified.
I also publish a newsletter where I share my techo adventures in the intersection of Telecom, AI/ML, SW Engineering and Distributed systems. If you like getting my post delivered directly to your inbox whenever I publish, then consider subscribing to my substack.
I pinky promise 🤙🏻 . I won’t sell your emails!